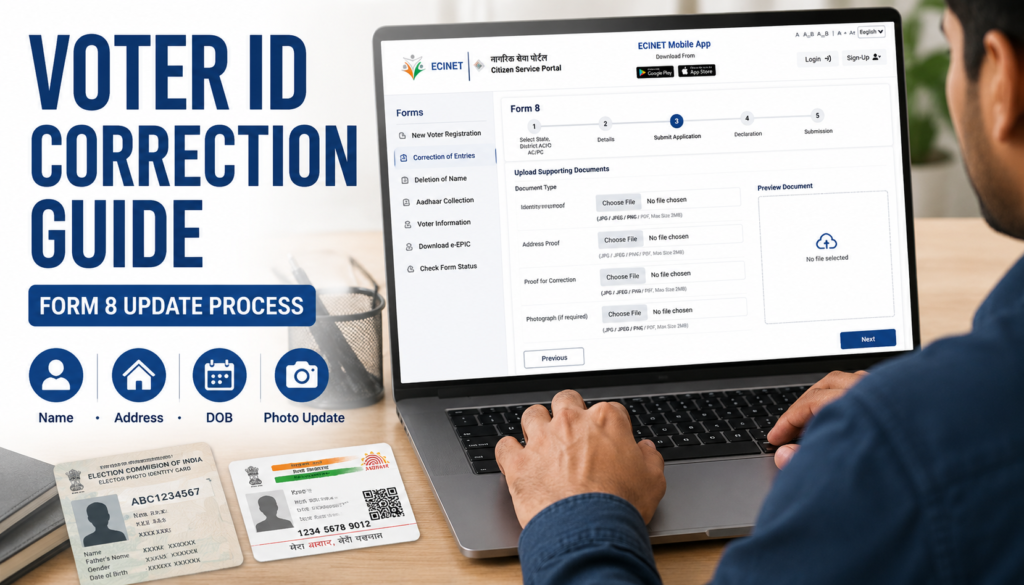
Voter ID Correction Guide Form 8 Step-by-Step Online Update Process
Agar aapke Voter ID mein naam galat hai, address change ho gaya hai, date of birth update karni hai ya kisi aur voter detail ko correct karna hai, to Election Commission ki taraf se Form 8 facility di jaati hai.
Yeh Voter ID Correction Guide aapko Form 8 ke actual online process ko samjhane ke liye tayyar ki gayi hai. Yeh generic article nahi hai. Ismein voter portal par dikhne wale Form 8 flow ke hisaab se step-by-step process explain kiya gaya hai.
Form 8 Kya Hota Hai?
Form 8 Election Commission ka official correction aur update form hai jo existing voter records ko update karne ke liye use kiya jata hai.
Form 8 ka use tab kiya jata hai jab voter list mein pehle se naam maujood ho aur kisi detail ko update ya correct karna ho.
Form 8 Se Kya-Kya Update Ya Correct Kar Sakte Hain?
Form 8 ke through generally yeh updates kiye ja sakte hain.
- Name correction
- Address update
- Date of Birth correction
- Gender correction
- Relation type correction
- Relative name correction
- Mobile number update
- Photo replacement
- EPIC replacement
- Person with Disability marking request
Important Note: Ek Form 8 application mein maximum 4 corrections hi select kiye ja sakte hain. Agar 4 se zyada details update karni hain, to additional application ki zarurat pad sakti hai.
Documents Required
Application submit karne se pehle relevant documents ready rakhein.
Aadhaar Details
Aadhaar number provide kiya ja sakta hai. Agar Aadhaar available nahi hai to portal mein alternative option bhi diya ja sakta hai.
Address Proof
Address update ke liye supporting address proof document upload karna hota hai.
Date of Birth Proof
DOB correction ke liye valid age proof ya date of birth proof document ki zarurat ho sakti hai.
Supporting Correction Documents
Jis detail ko update karna hai uske support mein document upload karna hota hai.
Photograph
Agar photo correction ya replacement karna hai to recent passport-size photograph ready rakhein.
Online Form 8 Application Process
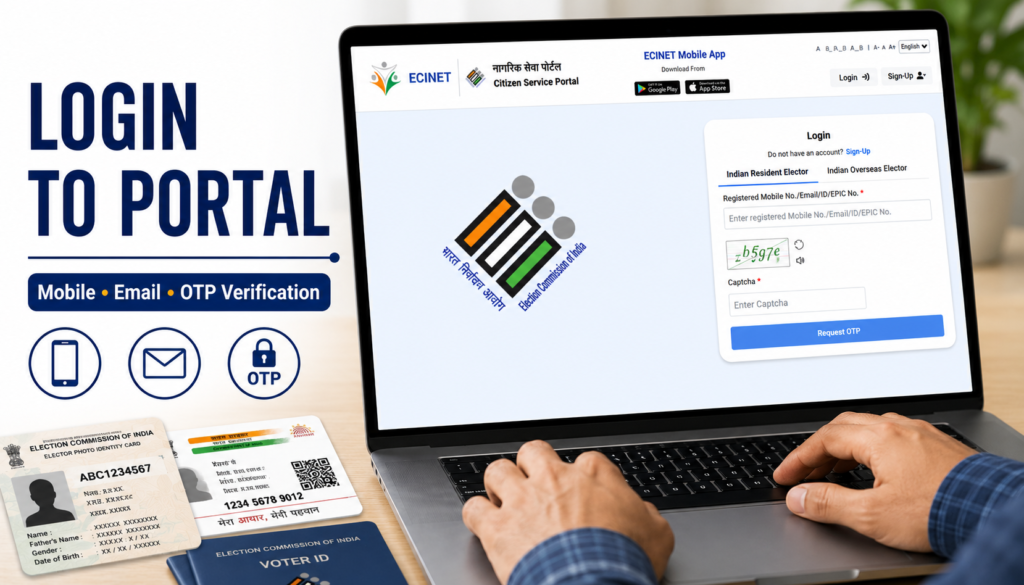
Step 1: Open Voter Service Portal
Sabse pehle Voter Service Portal open karein.
Portal par aap:
- Login kar sakte hain
- Sign up kar sakte hain
- Mobile Number se login kar sakte hain
- Email ID se login kar sakte hain
- EPIC Number se login kar sakte hain
Login ke baad OTP verification process complete karna hota hai.
Step 2: Open Correction of Entries
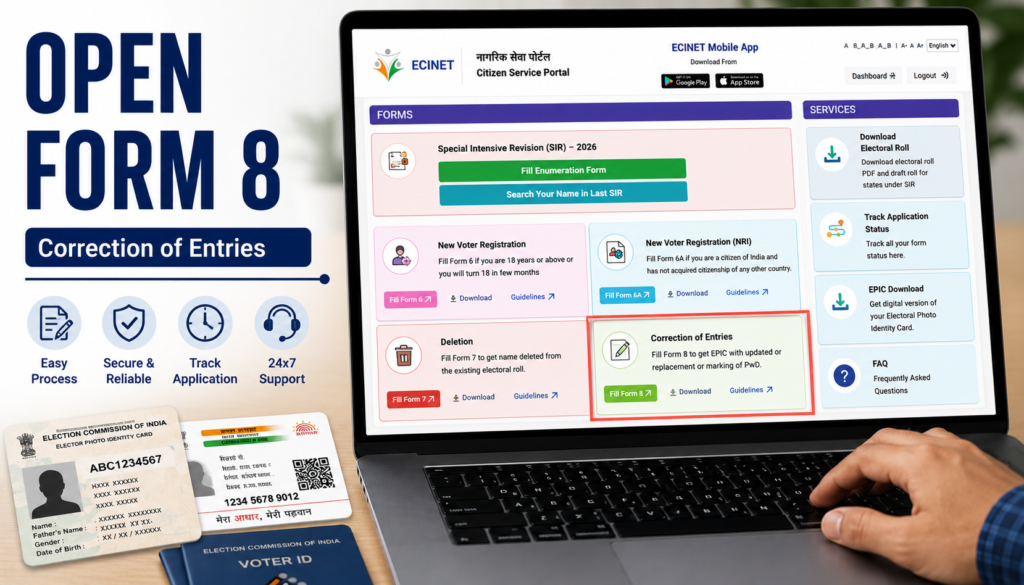
Login hone ke baad dashboard open hoga.
Dashboard mein Correction of Entries option dikhai dega.
Isi section se Form 8 correction application start ki jaati hai.
Step 3: Choose Applicant Type
Form 8 open karne ke baad applicant type select karna hota hai.
Available options:
- Self
- Other Elector
Agar aap apni details update kar rahe hain to Self select karein.
Agar kisi doosre eligible elector ke behalf par process kar rahe hain to Other Elector option use kiya ja sakta hai.
Is stage par EPIC Number enter karna zaruri hota hai.
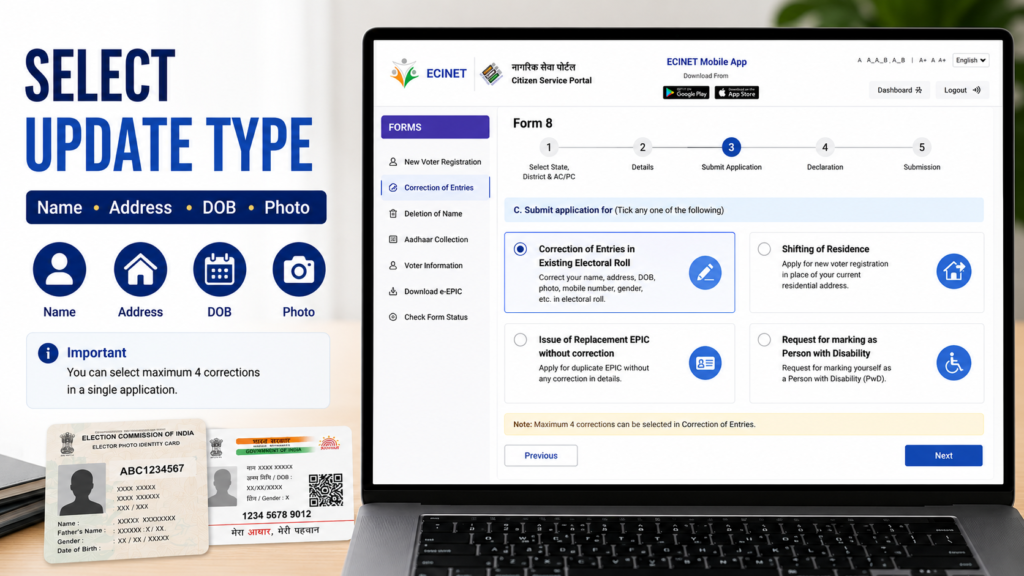
Step 4: Select Application Type
Applicant verification complete hone ke baad portal aapse application type select karne ko kahega.
Available options:
- Shifting of Residence
- Correction of Entries in Existing Electoral Roll
- Issue of Replacement EPIC without correction
- Request for marking as Person with Disability
Is article mein hum Correction of Entries in Existing Electoral Roll process par focus kar rahe hain.
Yeh option tab use kiya jata hai jab voter list mein kisi detail ko update ya correct karna ho.
Step 5: Select State, District and Assembly Constituency
Ab application form ka pehla section open hoga.
Yahan applicant ko select karna hota hai:
- State
- District
- Assembly Constituency
- Parliamentary Constituency (where applicable)
Details select karne ke baad Next button par click karein.
Step 6: Enter Personal Details
Is section mein applicant ki basic voter details enter karni hoti hain.
Generally fields include:
- Applicant Name
- EPIC Number
- Aadhaar Number
- Mobile Number
- Email ID
Portal mein Aadhaar-related options bhi dikh sakte hain:
- Aadhaar Number available hai
- Aadhaar Number available nahi hai
Jo option applicable ho use select karein.
Step 7: Choose Correction Type
Ab sabse important section open hota hai.
Yahan aap select karte hain ki voter record mein kya correction karni hai.
Available correction categories:
- Name
- Gender
- Date of Birth / Age
- Address
- Relative Name
- Mobile Number
- Photograph
Important: Ek Form 8 application mein maximum 4 corrections hi select kiye ja sakte hain.
Agar aapko 4 se zyada details update karni hain to additional application ki zarurat ho sakti hai.
Example: Aap ek application mein
- Name
- Address
- Mobile Number
- Photo
select kar sakte hain.
Lekin isse zyada corrections ek hi application mein select nahi karne chahiye.
Step 8: Upload Supporting Documents
Correction category select karne ke baad relevant documents upload karne hote hain.
Examples: Name Correction
- Supporting identity document
Address Update:
- Address proof
DOB Correction:
- Date of Birth proof
Photo Update:
- Recent photograph
Document upload karte waqt ensure karein.
- File clear ho
- Text readable ho
- Correct document upload ho
Galat document upload karne se application delay ho sakti hai.
Step 9: Declaration Section
Ab declaration page open hoga.
Yahan applicant ko:
- Place enter karna hota hai
- Date enter karni hoti hai
- Declaration accept karna hota hai
Declaration submit karne se pehle saari information ek baar verify kar lena chahiye.
Step 10: Captcha Verification
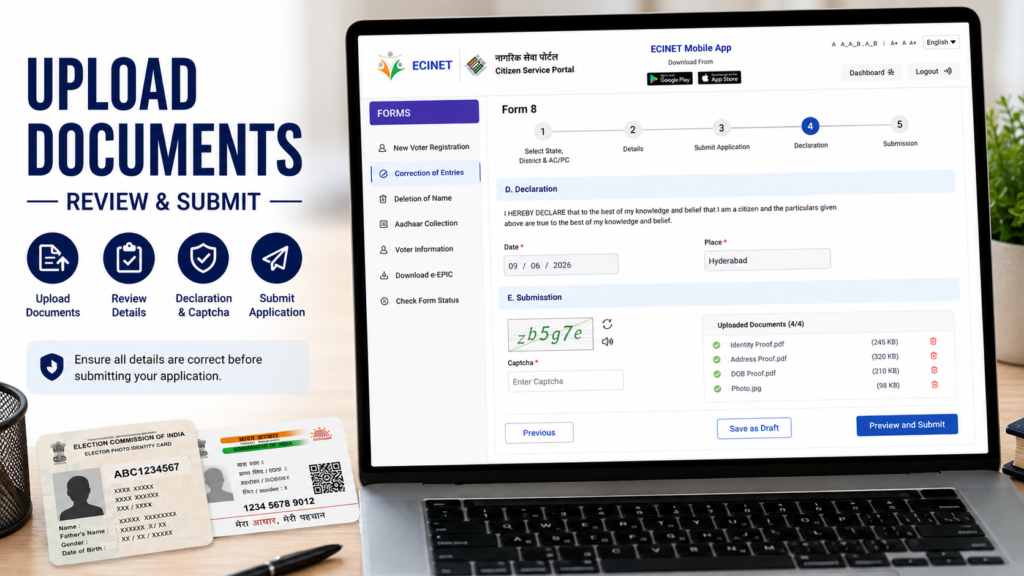
Final submission se pehle portal captcha verification mang sakta hai.
Process:
- Captcha dekhein
- Captcha box mein enter karein
- Preview and Submit button par click karein
Step 11: Aadhaar Verification
Portal ke flow ke hisaab se Aadhaar authentication process bhi dikh sakta hai.
Generally process:
- Aadhaar verification request
- OTP generation
- OTP verification
- Authentication confirmation
Jahan applicable ho wahan OTP verification complete karna hota hai.
Step 12: Preview and Submit
Submission se pehle preview screen open hogi.
Yahan verify karein:
- Name
- Address
- Date of Birth
- Mobile Number
- Uploaded Documents
- Correction Categories
Sab kuch sahi hone par Submit Application par click karein.
Successful submission ke baad application reference number generate ho sakta hai.
Is number ko future tracking ke liye save karke rakhein.
Offline Form 8 Option
Agar online application nahi karna chahte to offline process bhi available hota hai.
Offline Process:
- Form 8 PDF download karein.
- Form manually fill karein.
- Supporting documents attach karein.
- BLO ya ERO office mein submit karein.
Offline application ke liye official Form 8 guidelines aur PDF reference use karein.
Important Tips
- Aadhaar aur voter details match hone chahiye.
- EPIC Number carefully enter karein.
- Maximum 4 corrections rule yaad rakhein.
- Documents clear upload karein.
- Final preview zaroor check karein.
- Application reference number save rakhein.
Internal Links
Related Guides:
External Links
Official Resources:
Conclusion
Voter ID Correction Guide ke through Form 8 application process ko online complete kiya ja sakta hai. Is process ka use name correction, address update, date of birth correction, photo replacement aur doosri voter detail updates ke liye kiya jata hai. Application submit karne se pehle documents aur entered information ko dhyan se verify karna bahut zaruri hai.
FAQs
1. Form 8 kis kaam ke liye use hota hai?
Form 8 voter details correction aur update ke liye use hota hai.
2. Kya Form 8 se address update kiya ja sakta hai?
Haan, address correction ya update ke liye Form 8 use kiya ja sakta hai.
3. Ek Form 8 application mein kitni corrections select kar sakte hain?
Maximum 4 corrections select ki ja sakti hain.
4. Kya Aadhaar number mandatory hai?
Portal mein Aadhaar available na hone ka option bhi dikh sakta hai. Latest portal instructions follow Karein.
5. Application submit hone ke baad kya milta hai?
Application reference number generate ho sakta hai jisse future status track kiya ja sakta hai.